According to their website, H2O is a fully open source, distributed in-memory machine learning platform with linear scalability. H2O supports the most widely used statistical & machine learning algorithms including gradient boosted machines, generalized linear models, deep learning and more.
It uses MapReduce to break down tasks so that it can send tasts to workers on a cluster.
H2O also has an AutoML functionality that automatically runs through all the algorithms and their hyperparameters to produce a leaderboard of the best models.
The best way to understand AutoML is by showing a practical case. As an example we will use the Higgs Challenge data. Since the preprocessing is out of the scope of this post we can directly use a copy of the preprocessed data:
This is really straightforward:
import h2o
from h2o.automl import H2OAutoML, get_leaderboard

h2o.init()
This code will init an H2O session.
The first step is to load the data.
Then we will create a list with the names of all feature columns an another for the target.
The last step is to mark the target as a factor. This means setting it as a target.
All this can be done with:
# Import a sample binary outcome train/test set into H2O
train = h2o.import_file("https://s3.amazonaws.com/erin-data/higgs/higgs_train_10k.csv")
test = h2o.import_file("https://s3.amazonaws.com/erin-data/higgs/higgs_test_5k.csv")

# Identify predictors and response
x = train.columns
y = "response"
x.remove(y)

# For binary classification, response should be a factor
train[y] = train[y].asfactor()
test[y] = test[y].asfactor()
This creates an
H2Odataframe. You can always transform it to Pandas withx.as_data_frame()
The first step is to create the H2OAutoML object.
Since we aim to get reproducibility of the example we will set a seed.
When you do so you also need to specify the maximum number of models to be trained.
aml = H2OAutoML(max_models=20, seed=1, max_runtime_secs=training_minutes*60)
I also find it useful to limit the total amount of time that AutoML can spend on training.
Once the AutoML object is declared to train you only need to pass the training_frame and the names of both features and targets.
aml.train(x=x, y=y, training_frame=train)
You can see the results with lb = aml.leaderboard.
However it is more useful to see all possible information with:
# Optionally add extra model information to the leaderboard
lb = get_leaderboard(aml, extra_columns='ALL')

# Print all rows (instead of default 10 rows)
lb.head(rows=lb.nrows)
The total training time (for all models) of the example was limited to 2 minutes. The results are:
| model_id | auc | logloss | aucpr | mean_per_class_error |
|---|---|---|---|---|
| StackedEnsemble_AllModels_AutoML | 0.786427 | 0.555344 | 0.803633 | 0.319589 |
| StackedEnsemble_BestOfFamily_AutoML | 0.783762 | 0.557932 | 0.800806 | 0.33061 |
| GBM_5_AutoML | 0.780862 | 0.559708 | 0.79783 | 0.325399 |
| GBM_1_AutoML | 0.778997 | 0.56159 | 0.796523 | 0.326697 |
| GBM_grid__1_AutoML_model_2 | 0.778615 | 0.591319 | 0.795194 | 0.34516 |
| GBM_2_AutoML | 0.778338 | 0.561527 | 0.79632 | 0.329805 |
| GBM_3_AutoML | 0.776389 | 0.563906 | 0.793284 | 0.328065 |
| GBM_4_AutoML | 0.770758 | 0.570912 | 0.790371 | 0.353743 |
| DRF_1_AutoML | 0.765151 | 0.580246 | 0.783285 | 0.340491 |
| XRT_1_AutoML | 0.765134 | 0.582172 | 0.783059 | 0.349171 |
In order to compare the results of H2O AutoML I trained a Support Vector Classifier (SVC) and a Random Forest Classifier (RFC). Then I also did a GridSearchCV with the RandomForest to get some numbers.
The parameters for the GridSearchCV are:
{'n_estimators': [50, 100, 150, 200], 'max_features': ['auto', 'sqrt', 'log2']}
And the 3 metrics analized are:
In order to see if results could be improved I did another train with AutoML but limited to 2 hours instead of 2 minutes.
Here you can see how all models perform:
AutoML models are usally faster for predict and some of them perform better than the manual ones.
The training time with AutoML was lower than sklearn while having equal or better results.
Even though H2O uses MapReduce it might be useful to integrate it with spark. To do so you only need to use Sparkling water. This will help distribute tasks to workers using Spark.
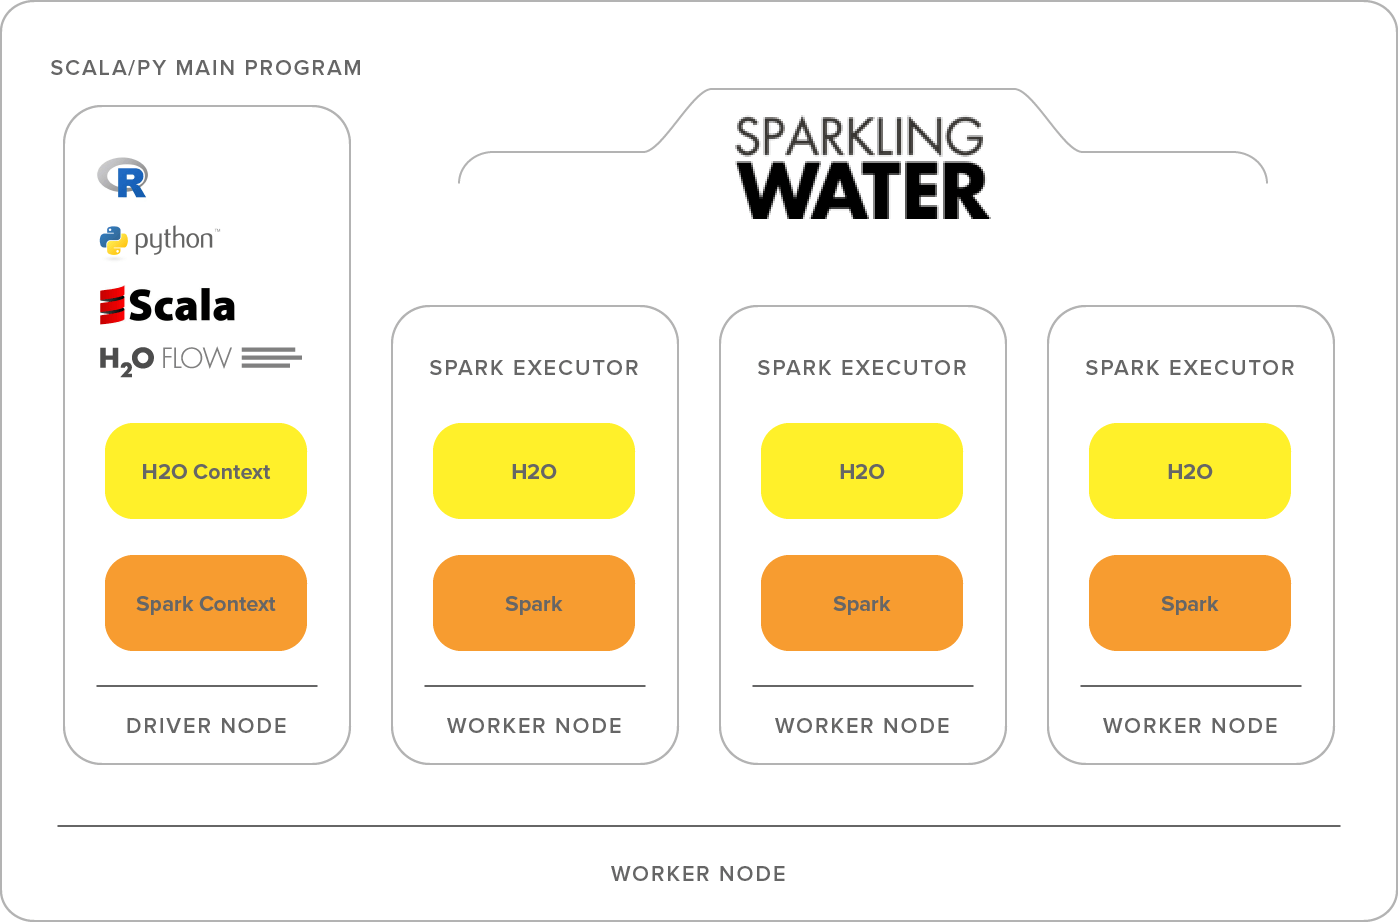
To install it read the official documentation.
Once it is installed you only need to replace the H2O initalization (h2o.init()) for:
from pyspark.sql import SparkSession
from pysparkling import H2OContext

spark = SparkSession.builder.appName("h2o_auto_ml").getOrCreate()
hc = H2OContext.getOrCreate(spark)